This was my first good quality deck that I purchased when I got back into skateboarding and I love the Zoo York brand. Therefore I was very happy with the purchase and whilst on sale, so here’s a break down of what happened over it’s usage.
How did the Zoo York deck ride?
I got my hands on a 7.75 deck, with a silhouette city line on the bottom (black and white), and it felt nice. Honestly it was a little short on the width but I got my kickflips, heelflips and ollies back with this deck. My toes hung over quite a bit, which meant landing and rolling away was sketchy but this was because I’m skating with size 10 feet on a short width board. I think if I picked an 8 or 8.25 in this then I would have been fine.
How was the concave of the Zoo York deck?
It wasn’t amazing, for me I think a steeper concave would have been nice. However it wasn’t flat, it’s a pro level deck and therefore I think concave is down to preference and style of skateboarding you like to do. As I said I managed to get my flips around and land them on my Zoo York and I do actually miss it a little when I skate now.
What are the weaknesses of Zoo York Decks?
In this area, we should assess my skateboarding style. I am mainly street but street sections of skate parks, not stair sets or hand rails, and nasty pavements/sidewalks. Think more ledges, banks, ramps, and some quarters. I skated my Zoo York deck for a total of 6 months, where I went out 1-2 times a week and each session was about 1-2 hours long.
26 weeks x 2 sessions = 52 sessions
52 sessions x 2 hours a session = 104 hours skateboarding
Zoo York Setup
Deck: 7.75 Zoo York
Grip: Basic shop applied grip
Trucks: Zoo York
Wheels: Zoo York (52mm white)
Risers: Pig Risers ¼”
Bushings: Basic shop supplied
Bearings: Reds Big Balls
Zoo York Deck Dissection
Lets diagnose the state of the deck after this 6 months of skateboarding (in the UK weather).
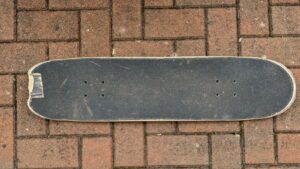
Top of the deck suffered a few issues. The primary was a big chip in the first few layers of the deck, as can notably be seen. The second is a pressure crack that started to appear between the back bolts. Finally at the tail even before the big chip, the Zoo York deck started to chip away, so the tail looks flat (I’d say this is general wear and tear). The main pressure crack and chip come from my heavy landing on tre-flip attempts and then drops off ledges when I’m doing 50/50’s.
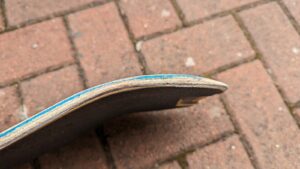
The sides of the zoo york deck held up well, after 6 months I couldn’t see any delamination of the deck, I also couldn’t see any of the middle lays falling out, so the adhesive holding the 7 layers of the Zoo York deck really worked well.
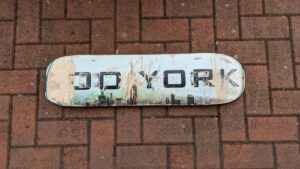
The underside of the Zoo York also held up well I think. The graphic is still quite visible, considering the level that I skate at. You can see how the tail squared off more notably on the underside but other than that, there’s a few wheel bites and that’s all. Interestingly enough you can’t see the pressure crack on the underside of the deck.
Summary of the Zoo York deck.
To summarize, I purchased this as a complete on sale, and that it was a very good deck which held out for 6 months of me starting to skateboard again. I was landing ollies, kickflips, heelflips, handling 5050’s on ledges, and performing some park skating, such as boxes, quarter pipes and half pipes. Now I’d be surprised if any brand lasted me longer than 6 months, so I’m very impressed with Zoo York and would I buy again, yes! The only improvement I could ask for, would be a little more concave on the deck.
I am currently riding an Element deck, but this is because I want to test different brands before I settle for a favourite. In the mean time, check out my review on the Adidas VS Pace Lifestyle Trainers

3 thoughts on “Zoo York Deck Review”
Comments are closed.